programming4us


Applications Server

Microsoft Systems Management Server 2003 : Modifying Installation Scripts Using Script Editor (part 2) - Modifying the Script, Windows Installer Step-Up Utility Buttons

- Free product key for windows 10
- Free Product Key for Microsoft office 365
- Malwarebytes Premium 3.7.1 Serial Keys (LifeTime) 2019
6/21/2012 4:53:33 PM

Modifying the Script

Now let’s take a look at how to make some simple modifications to our script using Script Editor. To do so, follow these steps:

1.
In the Installation Expert interface, choose Script Editor from the View menu to display the Script Editor interface, shown previously in Figure 1.

2.
Choose Open from the File menu to display the Open dialog box, shown in Figure 3, and then select a script (.IPF) file to open for editing. For this example, we’ll use the script we created earlier. Click Open to open the script for editing.

Figure 3. The Open dialog box.


3.
Next we’ll edit the variable that specifies the installation directory the program will use. In this example we’re installing to the Microsoft TechNet directory. We’ll change this to TechNet.

Choose Find from the Edit menu to display the Find Text In Installation Script dialog box, shown in Figure 4. Enter Maindir in the Find What text box, and then click Find Next. The first instance of a script line containing “Maindir” is selected. This is the variable setting for the directory location of the Office installation we want to modify. Click Close to close the dialog box.

Figure 4. The Find Text In Installation Script dialog box.


4.
Click Edit Script Item button on Installation toolbar or double-click the Set Variable statement containing “Maindir” to display the Set Variable dialog box, shown in Figure 5. In the New Value text box, enter TechNet and then click OK. The variable setting is modified in the Installation Script pane of the Script Editor interface.

Figure 5. The Set Variable dialog box.


You’d accomplish any additional script modifications in much the same manner. After we’ve completed our editing of the script, we’re ready to test and compile the installation script file. This will give us the SMS Installer–generated executable file.

Windows Installer Step-Up Utility Buttons

The Script Editor also offers three buttons that you can use to assist you in creating and testing Windows Installer packages. These are the three buttons at the far right of the toolbar in the Script Editor interface as seen previously in Figure 1. They are (in order from left to right as seen in the Script Editor window):

  • Compile As Windows Installer Package Lets you create a new Windows Installer package or convert an existing SMS Installer package to a Windows Installer package.

  • Run As Windows Installer Package Lets you run the Windows Installer package you create on the reference computer exactly as it would run on the target computers.

  • Uninstall Windows Installer Package Lets you remove a Windows Installer package that you installed on the reference computer using the Run As Windows Installer Package button.

The use of these buttons is fairly straightforward. You need to have opened or created an SMS Installer or Windows Installer script—an .IPF file. Then click the appropriate button to carry out the task. A command-line version of the Windows Installer Step-Up Utility is also included when you install SMS Installer on the reference computer. Selecting the option ISU Command-Line Utility in the Microsoft SMS Installer program group displays a command prompt window, shown in Figure 6, that lists the command-line options that are available and the command syntax, and that places the command prompt in the appropriate directory to run the utility. You can also refer to the SMS Installer Help for detailed instructions for using the Windows Installer Step-Up Utility.

Figure 6. Windows Installer Step-Up Utility command prompt window.

Real World: Sample Script

Occasionally you might encounter a situation in which you don’t want to install an application or run the installation script if certain elements aren’t in place on the target computer. For example, you might want to verify that there’s enough disk space available before proceeding or that a particular program file exists. This example uses a file to indicate whether a computer should execute the installation script. This is a simple text file that you create and copy to all the computers that shouldn’t execute the script. If the file is found on the computer, the script will be terminated. If the file isn’t found, the script will 
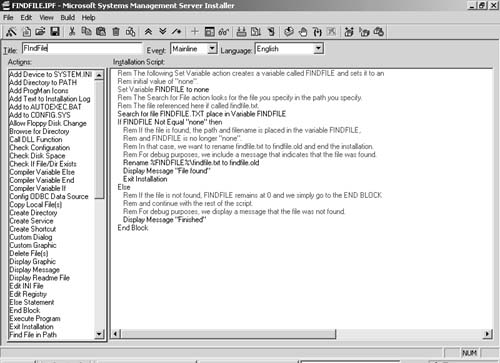
continue.

The sample SMS Installer script routine shown in Figure 7 demonstrates how to test for the existence of a file, and you can incorporate it into larger scripts. It provides a basic structure that you can easily modify to meet other needs.

Figure 7. Sample SMS Installer script designed to find a file and perform an action.

This script is designed to look for a specific file identified in the script as Findfile.txt using the Search For File action. In the Actions list, doubleclick Search For File to display the Search For File Settings dialog box, shown in Figure 8.
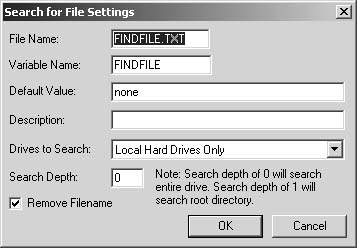
Figure 8. The Search For File Settings dialog box.


In the Search For File Settings dialog box, specify the file and path to search for and whether to search all local drives, all network drives, or both. The path that’s searched is determined by the Search Depth value. A value of 0 indicates that the entire drive will be searched. A value of 1 indicates that the root drive will be searched. Values of 2, 3, and higher indicate that the first directory level, second directory level, and so on will be searched. In this example we’ll search all local drives.

Select the Remove Filename check box. If the file is found, the file and its path will be stored in the variable FINDFILE. This option will remove the file entry and keep just the path, which can be useful if you’re trying to capture a specific path or need to rename a file, as we do in this script.

The script begins by using Set Variable to define a variable named FINDFILE. This variable is set to a default value of None to indicate that no file has been found. The Search For File action looks for the file on all local drives on the target computer. If the file is found, the file and its full path are placed in FINDFILE, and the value of FINDFILE is no longer None. Simple IF/THEN logic tests to determine whether FINDFILE is still None. If it’s not, the file has been found, and we’ll rename it Findfile.old. If the file hasn’t been found, we simply continue on with the rest of the script. The script also includes display messages for debugging purposes to alert us when the file has been found. You can remove these messages after the existence of the file has been tested.

You can easily modify this basic script routine to perform any number of actions or tasks—for example, deleting the file, moving the file to a new location, or creating a new file with the same name as an existing file if that file isn’t found.

Other -----------------
- System Center Configuration Manager 2007 : Architecture Design Planning - Site Planning
- System Center Configuration Manager 2007 : Hierarchy Planning
- Microsoft Systems Management Server 2003 : Modifying Installation Scripts Using the Installation Expert (part 2)
- Microsoft Systems Management Server 2003 : Modifying Installation Scripts Using the Installation Expert (part 1)
- Sizing Considerations for mySAP Components (part 2) - Sizing mySAP Business Intelligence & Sizing mySAP SRM
- Sizing Considerations for mySAP Components (part 1) - The SAP Exchange Infrastructure
- Active Directory Domain Services 2008 : Transfer the Infrastructure Master Role
- Active Directory Domain Services 2008 : Transfer the PDC Emulator Role
- SAP Hardware, OS, and Database Sizing
- Preparing for the SAP Sizing Process
- Microsoft Systems Management Server 2003 : Systems Management Server Installer Tools & Creating Installation Scripts
- Installing Systems Management Server Installer
- Microsoft Dynamic GP 2010 : Installing Integration Manager (part 2) - SQL Server maintenance jobs
- Microsoft Dynamic GP 2010 : Installing Integration Manager (part 1) - SQL Server and database settings
- Active Directory Domain Services 2008 : Transfer the RID Master Role
- Active Directory Domain Services 2008 : Transfer the Domain Naming Master Role
- Microsoft Dynamics AX 2009 : Working with Forms - Modifying application version
- Microsoft Dynamics AX 2009 : Working with Forms - Modifying the User setup form
- Microsoft Dynamics AX 2009 : Working with Forms - Adding a Go to the Main Table Form link
- Designing and Optimizing Storage in an Exchange Server 2007 Environment (part 4)


Top 10
 
- Microsoft Visio 2013 : Adding Structure to Your Diagrams - Finding containers and lists in Visio (part 2) - Wireframes,Legends
- Microsoft Visio 2013 : Adding Structure to Your Diagrams - Finding containers and lists in Visio (part 1) - Swimlanes
- Microsoft Visio 2013 : Adding Structure to Your Diagrams - Formatting and sizing lists
- Microsoft Visio 2013 : Adding Structure to Your Diagrams - Adding shapes to lists
- Microsoft Visio 2013 : Adding Structure to Your Diagrams - Sizing containers
- Microsoft Access 2010 : Control Properties and Why to Use Them (part 3) - The Other Properties of a Control
- Microsoft Access 2010 : Control Properties and Why to Use Them (part 2) - The Data Properties of a Control
- Microsoft Access 2010 : Control Properties and Why to Use Them (part 1) - The Format Properties of a Control
- Microsoft Access 2010 : Form Properties and Why Should You Use Them - Working with the Properties Window
- Microsoft Visio 2013 : Using the Organization Chart Wizard with new data
- First look: Apple Watch

- 3 Tips for Maintaining Your Cell Phone Battery (part 1)

- 3 Tips for Maintaining Your Cell Phone Battery (part 2)
programming4us programming4us